Prepping for Laminate Floor Installation
Laminate floors have become a popular choice for people looking to update or upgrade their old floors. It’s inexpensive, easy to care for, wears like iron and in most cases you can put it right down on top of your old flooring – even below grade (just don’t try it on carpet). It’s very adaptable and can take on all kinds of appearances – hardwoods and exotics like cork and bamboo or even ceramic or slate tiles.
Laminate flooring is often called a floating floor or Pergo flooring. It’s known as floating because it literally sits (or floats) on top of the subfloor. It isn’t fastened in any way, even around the edges where you need to leave a gap of at least 1/4″ between the flooring and the walls. Pergo is the name of the Swedish company who actually came up with the idea of floating floors.
Laminate flooring comes in boards 8 to 10 inches wide and 48 inches long. It’s made of a middle layer of high density fiberboard (HDF), a man made wood product of compressed and bonded wood fibers; covered by a “design layer” of cellulose paper with a print or even a photograph of a pattern; all covered by layers of clear melamine plastic resins. The fact that the image on the design layer can be virtually any type of wood or even tile is what makes laminate’s appearance so adaptable.
The flooring pieces fit together (literally lock together) using tongue and groove joints on each side of the flooring boards. The flooring is installed over a thin closed cell foam plastic underlay that provides cushioning for the floor and helps to reduce noise.
Preparation
- Measure the floor area you want to cover and add 10 percent for waste.
- Installation kits for laminate flooring are available wherever laminate flooring is sold. They cost less than $20 and include specialized tools like a tapping block and a pry bar for working in close to walls plus some spacers to keep the laminate away from the wall. They’re well worth the price.
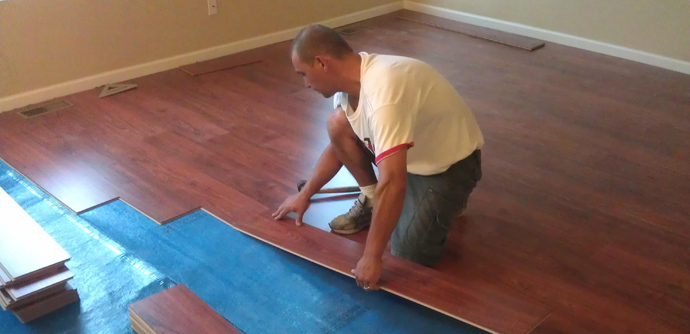
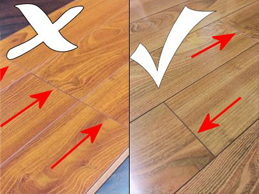
- Laminate is usually installed running the length of a room; however, some people prefer to run it parallel to the light entering the room (see photo).
- Be sure to bring your laminate flooring into the house at least 48 hours before you begin installation. This will allow it to acclimatize to the humidity level in your home and the boards won’t move after the floor is installed
How to Install Laminate Flooring
What you need:
 Nails Hammer Leveling compound Underlay Laminate flooring Duct tape Plastic sheeting (for concrete) Spacers Pry bar Circular saw Jigsaw Safety gear
Any remodeling project can be time consuming and expensive. Redoing your floor doesn’t have to be. Save money on an expensive contractor by installing your new laminate floor yourself.
Step 1 — Prep the Area
Take off baseboards and moldings all around the room and remove any doors in the room. Fasten down any loose or squeaking floorboards and use leveling compound to get rid of any dips in the floor. If you have taken up carpet, make sure you remove any nails or tacks that might be left.
Step 2 — Install the Underlay
Install the underlay (it usually comes in 36″ or 42″-wide rolls) by rolling it out in rows butted against each other without overlapping. Tape the seams with duct tape. If you are putting the laminate directly on top of a concrete floor, first put down a plastic sheet to act as a vapor barrier before putting down the underlay.
Step 3 — Check the Door Jambs
The height of the new laminate flooring may mean your doorframes need to be modified. Check by laying a piece of the flooring on top of the underlay and see if it fits below the jamb. If not, mark the jamb and cut it so the flooring can slide under it.
Step 4 — Measure
Starting at the far side of the room, measure across the room to determine if you need to cut the first plank. You want to end up with the pieces on both sides of the room approximately the same width.
Step 5 — Lay the First Row
Lay the first boards against your starting wall, groove side towards the wall. If you do need to cut the first row of boards to width, cut off the groove side. Use spacers (or a piece of flooring on edge) to ensure you leave a 1/4-inch gap between the flooring and the wall. You need to leave this gap between the flooring and the wall all around the room to allow for minor seasonal variations in the boards themselves.
Step 6 — Cutting the Laminate
Cut laminate flooring with a circular saw with a fine tooth blade or a jig saw. Using a power saw, cut laminate good side down, to reduce tear out on the cuts.
Don’t forget to wear the appropriate safety gear such as goggles and gloves while you work.
Step 7 — Laying the Rest
Lay out the first three rows as follows: The first board in the first row needs to be a full board. The first board in the second row should be 2/3 of a board, and the first board in the third row should be 1/3 of a board. Fill in the rows with full boards and cut boards to fit the remaining space. Repeat the pattern as you move across the room, ensuring that joints are always at least 8 inches from each other.
Join the boards together by inserting the tongue into the groove at a high angle and then pushing down. The boards will click together. Tapping gently with a hammer and the tapping block may be necessary to make sure the boards lock together.
When you are working close to the wall, the pry bar specially designed to work with laminate flooring helps pull the boards into place end to end. Never use the hammer directly on the pieces of laminate as you could damage the edge of a piece so badly that nothing will be able to fit with it.
Step 8 — Finishing
Once the floor is down, reinstall your baseboards and moldings, making sure you nail them to the wall and not the laminate flooring. This will cover that 1/4-inch gap you left around the perimeter of the room.
You can sit back and enjoy your new floor now! You will also enjoy knowing you saved money by doing it yourself.
Laminate Tile Replacement
Materials and Tools Needed:
- New replacement tile
- Matching Laminate Filler/Sealer
- Adhesive
- Blue tape
- Drop cloth/Craft Paper
- Safety glasses
- Pencil or Marker pen
- 2, Square edge tapping blocks
- Hammer
- Chisel
- Vise Grips (optional)
- Duct tape
- Utility knife
- Tongue & Groove Dresser (optional)
- Circular Saw with carbide tipped blade
- Table saw (optional)
- Suction cups (optional)
- Weighted bags or Covered blocks
- Damp rag
- Shop Vac
- Sand paper (220 or finer) and sanding block
Please Read Through Instructions Before Starting
Removal and Prep
- Verify color and style of new tile.
- Acclimate the replacement tile for a mininimum of 48 hours in the room where it is being applied.
- Before starting, check the size of replacement tile by laying it face down on the tile to be replaced and check for size fit. Note: Manufacturing tolerance for size is +/- .05mm.
- To protect the surrounding floor, put masking tape around the old/damaged tile. Then, tape a drop cloth, craft paper or similar material to the masking tape to protect the surrounding floor to keep saw dust and other debris from getting under the protective covering.
- Next, using a felt tip or pencil, draw lines parallel to the edges of the tile to be replaced, about one inch in from the edge. This will result in a “boxed” saw line around the inside edges of the tile. See Figure 1.
PUT ON SAFETY GLASSES AND WEAR THEM FOR THE REMAINDER OF THE PROJECT.
- Set circular saw blade depth to exact thickness of plank (5/16″) and cut on lines. One of your objectives is to do as little damage as possible to the foam underlayment or Quiet Stride.
- Cut the old/damaged tile on the saw cut lines using a circular saw. Use care so as not to cut or damage the surrounding tile(s). Blue tape can be used to outline the old/damaged tile to help prevent over cutting.
- The “center” section of the old/damaged tile may now be removed using suction cups or by levering it out using a chisel/screwdriver. The result will be a “picture frame” effect left from the old/damaged tile.
- With the circular saw, make a relief cut diagonally from the center of the damaged Tile into each corner, stopping short of adjoining Tiles. Make a relief cut on each of the four sides, from the center out, stopping short of the adjoining Tiles. See Figure 2.
- Vacuum out cuts and surrounding areas.
- Starting at one of the sides, insert a pry bar (or lever of some type) and slighlty lift the surrounding floor. This will allow you to gently rock or wiggle the picture frame section and relax the glue bond. DO NOT MOVE THE PIECE UPWARD AS THIS MAY DAMAGE THE EDGE OF THE SURROUNDING FLOORING. ROCK OR WIGGLE THE PIECES DOWNWARD. This may take 3 or 4 times to relax the glue bond.
- Drive the perimeter pieces off the adjoining tiles with a chisel or vise grips.
- Vacuum the opening and surrounding areas.
- Use the tongue &groover dresser or chisel and knife to remove excess glue and core fragments from the exposed tongue and groove.
- Use the tongue &groover dresser or chisel and knife to dress or “size” the exposed tongue and groove.
- Use a scrap piece of laminate flooring to: a) check the size of the tongue and groove, and b) check for a flush fit (to prevent Ledging, Proud edge, or Overwood).
- DO NOT FORCE THE TONGUE OF THE SCRAP PIECE INTO THE EXPOSED GROOVES AS IT WILL CAUSE THE GROOVES TO EXPAND.
- Remove any blue tape still on floor.
- Once the tongue and groove have been cleaned up, use a pry bar to gently lift adjoining tiles and vacuum up any remaining debris.
- Repair any tears in the underlayment with duct tape.
Installing the New Plank
Standard Method :
- Carefully examine the new tile for defects.
- Carefully place the new tile upside down and in to the opening to verify length and width. The manufacturing tolerances are +/- .05mm for size so it is possible to have a replacement tile that is slightly larger or smaller than the original.
- If the tile is too large, carefully sand off a small amount from the grooved edges as needed until it fits into the opening. OR, if the tile is too small, use Laminate Filler/Sealer after replacement to improve the appearance and maintain the water resistance.
- Spread a thin coat of adhesive on any areas where you have sanded to replace the Zero H20 Edge sealant that has been removed.
- WITH THIS METHOD YOU SHOULD NOT HAVE TO “DRY FIT.” DRY FITTING INCREASES THE CHANCES OF DAMAGING THE NEW AND SURROUNDING TILE.
- Replacement Tile Preparation – With a table saw or circular saw remove the lower lip part of both grooved edges on the new tile. (CAUTION: Only cut as deep as is needed to remove lower lip.)
- At the corner where the tongues meet, measure back from the corner approximately 2″in each direction. These portions of the tongue need to be carefully removed without disturbing the decorative top layers. See Figure 3.
On the other end of the tile (away from the just removed corner), remove about 2″ of the tongue. These cuts will provide you the “wiggle” room to insert the tile. See Figure 3.
- Cutting off 1/16″ from the outer edge of the tongues will also help to insert the tile, but is not mandatory.
- In the opening of the existing floor, apply adhesive into the groove (about 1/16″ bead) and on the top of the tongue (about 1/8″ bead) of the adjoining planks. (CAUTION: over filling the groove will make inserting the tile difficult.)
- Apply a 1/16″ bead of adhesive to the top of the tongues on the new tile and spread it evenly with your finger.
- Install the new tile by inserting it (tongue edges first) on an angle into the opening in the floor. Suction cups make handling the tile easier.
- Place a tapping block against each grooved edge.
- Alternately tap on each block with a hammer. Focus on keeping the leading tongue edge of the new tile seated before fully seating the other tongue edge.
- You will need to press downward on the tongue edges of the new tile as it is being seated.
- When the new tile is in place, use a tapping block and hammer to seat the grooved edges by firmly tapping on them until the new tile is level with the adjoining ones.
- Remove excess glue with a clean damp cloth.
- Place weight on the new tile to apply pressure for 30-45 minutes.
- Protect the new tile from traffic for 12 hours.
- Clean up any dried glue residue with acetone.
Optional Method:
- Carefully examine the new tile for defects.
- Carefully place the new tile upside down and in to the opening to verify size. Use suction cups to make handling easier.
- WITH THIS METHOD YOU SHOULD NOT HAVE TO “DRY FIT.” DRY FITTING INCREASES THE CHANCES OF DAMAGING THE NEW TILE AND ADJOINING TILES.
- Cut the tongue off the leading edge of the new tile. With a router bit, route a matching groove in the same end of the new tile.
- With a table saw or circular saw remove the lower part of all three grooved edges on the new tile. (CAUTION: Only cut as deep as is needed to remove lower lip.)
- Cut a 14″ piece of spline and glue it into the leading grooved edge of the opening.
- Cut 1″ off each end of the remaining tongue on the new tile.
- In the opening of the existing floor, apply a 1/16″- 1/8″ bead of adhesive into the groove and on the top of the tongues of the adjoining tiles. (CAUTION: over filling the groove with adhesive will make inserting the tile difficult.)
- Apply a 1/16″- 1/8″ bead of adhesive to the top of the tongue on the new tile and spread it evenly with your finger.
- Install the new tile by inserting it into the grooved portion of the opening in the floor.
- When the new tile is in place, use a tapping block and hammer to seat the grooved edges by firmly tapping on them until the new tile is level with the adjoining ones.
- Remove excess glue with a clean damp cloth.
- Place weight on the new tile to apply pressure for at least 30-45 minutes.
- Protect the new tile from traffic for 12 hours.


I have noticed you don’t monetize your website, don’t waste your traffic, you can earn additional
bucks every month because you’ve got hi quality content.
If you want to know how to make extra $$$, search for:
Mrdalekjd methods for $$$