Preparing Cement for Epoxy Coating
What you need as below:
 Wiping or cleaning materials
- Liquid soap or detergent
- Acid solution
- Mask
- Plastic or acid-resistant containers
- Water
- Muriatic acid, phosphoric acid or sulfamic acid
- Can or acid-proof spray pump unit
It is important to prepare a cement floor before applying epoxy coating to ensure that the epoxy will last longer. There are several ways to prepare concrete for epoxy coating.
Shot Blasting
Shot blasting is a process in which special equipment is used to help prepare the concrete or cement before epoxy paint can be applied. Only trained professionals use this method because it requires special training skills. Shot blasting can remove sealers on concrete services.
Sand Blasting
Sand blasting is the process of propelling very fine bits of material, usually sand, steel grits, copper slags, walnut shells, at high-velocity to clean or etch a surface. Just like Shot blasting, equipment is used for this method.
Grinding
Grinding is another method used to prepare cement for epoxy coating. Grinders are used to clean and remove existing coating on the concrete. Usually a diamond grinding disk is used although there are other types of abrasive disks, this one is commonly preferred. Acid etching is the most serious surface preparation method available for do-it-yourself enthusiasts because it does not require the use of special equipment and can be easily achieved.
Chemical Etching
Chemicals such as muriatic acid, phosphoric acid or sulfamic acid are used to prepare the cement for epoxy paint. Extreme caution should be practiced when using this method because the chemicals can cause severe harm if not used or diluted properly. Since acid etching is the method that can be done without the use of equipment to prepare cement before applying epoxy paint, here is the step by step guide on how to do it properly.
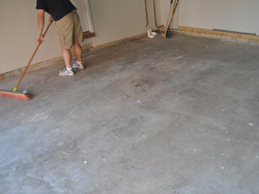
Step 1 – Clean the Cement Floor
The first thing you need to do is sweep or vacuum any dirt or dust on the surface. After making sure that dirt and dust has been vacuumed or swept, wash the floor with a liquid soap or detergent. Watch out for areas that create water beads, this means that that area needs more cleaning because it may have grease or oil on it.
Step 2 – Choose an Acid Solution
Please use a mask before proceeding. Only use plastic or acid resistant containers, and remember to add acid to water and never water to acid. If using muriatic acid, dilute 10% to 15% with water, use 1 gallon for every 40 to 50 square feet. If your choice is the phosphoric acid, a 20% to 40% Phosphoric acid solution should be okay. Sulfamic acid is a white powder that should be dissolved in hot water. Mix a pound of sulfamic acid with 1 gallon of warm water to treat 300 square feet.
Step 3 – Apply the Acid Solution to the Floor
You can either pour it from a can or use an acid proof pump spray unit. Spread the acid evenly. Wait for it to settle for 5 to 10 minutes.
Step 4 – Rinse the Floor
Mop up excess water and dry cement. When the cement is completely dry, you can vacuum once more.
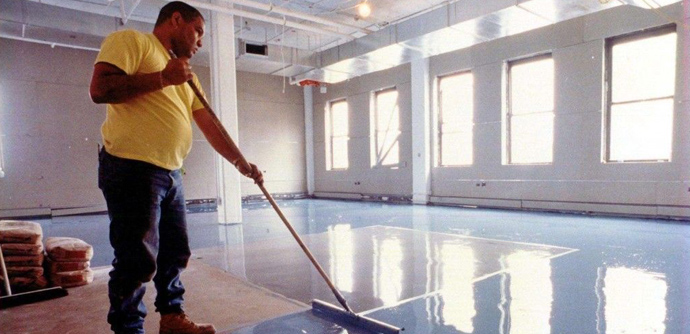
Step 5 – Apply the Coating
When you are satisfied with how the cement has been cleaned then now you can apply the epoxy coating.
Cleaning Epoxy Floor Coating
After Installation
 Broom
Broom- Hose
- Paintbrush
- pH Neutral dish soap
- Water and pail
- Rayon mop
- Bristle brush
- Squeegee
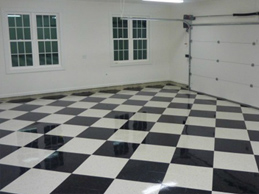
When it comes to durability, epoxy coated floors are at the top of the list but that does not mean that you shouldn’t take due care of your epoxy floor coating. Epoxy floors can easily resist chemicals than other kinds of flooring. Even if you use your patio or your garage the most within the day, you are assured that your epoxy floors are resilient enough to resist such traffic. Maintaining your epoxy floors does not require that much effort. You can keep your floors dust and particle free with minimal hassle.
Step 1 – Sweep and Pre-Rinse the Floor
It is very easy to sweep off large debris and other visible dust particles from your epoxy coated floor. If you’re working with your patio or garage floor, getting rid of all that dust by hosing everything out won’t be that difficult. Make sure though that you also remove dusts that have accumulated at the sides and corners of the room. Make use with a paintbrush to remove them.
It is very easy to sweep off large debris and other visible dust particles from your epoxy coated floor. If you’re working with your patio or garage floor, getting rid of all that dust by hosing everything out won’t be that difficult. Make sure though that you also remove dusts that have accumulated at the sides and corners of the room. Make use with a paintbrush to remove them.
Step 2 – Prepare the Cleaning Solution
You can use any kind of all purpose cleanser for your cleaning solution but the experts find that using pH neutral dish soap is actually more effective the former. At the same time, a neutral cleaning solution is gentler than most cleaning agents that may eat away your epoxy coating. Mix 1/3 cup of dish soap with a gallon of water in a pail. You can use lukewarm or cool water but never use hot. Using your mop, mix everything until the dish soap is fully dissolved. You can use any kind of all purpose cleanser for your cleaning solution but the experts find that using pH neutral dish soap is actually more effective the former. At the same time, a neutral cleaning solution is gentler than most cleaning agents that may eat away your epoxy coating. Mix 1/3 cup of dish soap with a gallon of water in a pail. You can use lukewarm or cool water but never use hot. Using your mop, mix everything until the dish soap is fully dissolved.
Step 3 – Mop the Floor
Use the solution to mop the entire floor. You can use any kind of mop for this job but rayon mops are actually better than bristled brooms or cotton mops. Rayon mops allow you to mop the entire area without snagging at the same time it is non-abrasive so your epoxy coating won’t be scratched or damaged.
Use the solution to mop the entire floor. You can use any kind of mop for this job but rayon mops are actually better than bristled brooms or cotton mops. Rayon mops allow you to mop the entire area without snagging at the same time it is non-abrasive so your epoxy coating won’t be scratched or damaged.
Step 4 – Scrub Dark Stains
Scab the entire area for any kind of stain or discoloration. If you find any, use a bristle brush to restore the natural color. You should also brush those tough to reach areas like corners and sides to make sure that they are getting as much attention as the rest of the floor. One thing that you have to remember with brushes is that if you get one with really tough bristles, there might be a possibility of you scratching your epoxy coated floor.
Scab the entire area for any kind of stain or discoloration. If you find any, use a bristle brush to restore the natural color. You should also brush those tough to reach areas like corners and sides to make sure that they are getting as much attention as the rest of the floor. One thing that you have to remember with brushes is that if you get one with really tough bristles, there might be a possibility of you scratching your epoxy coated floor.
Step 5 – Rinse Off
Hose down the entire floor with water. If you let the entire area dry on its own, there’s a possibility of the growth of molds and mildew. To prevent that from happening, use a squeegee to absorb the excess water from your floor. This may be a really tedious task but it’s a lot better than having to deal with molds and mildew in the future.


Recent Comments