Garage Storage Projects: Storage Towers With Drawers
Overview
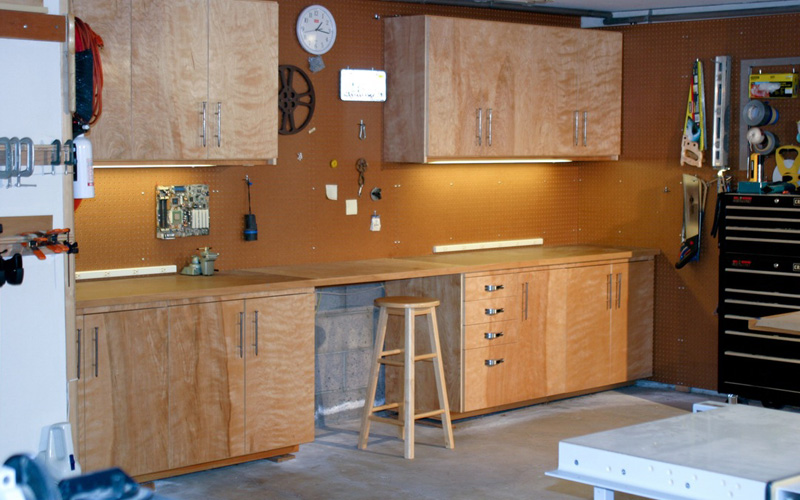
This versatile storage system is the ultimate all-purpose odds and ends organizer for your garage. It’s composed of tall, shallow towers that hold a wide variety of adjustable shelves and bins. By installing the towers along the same wall, you can add a range of special storage features between them—notched shelves for skis and fishing rods, pairs of dowels to corral balls, brackets for the trolling motor, and more (lead photo). The tower shelves can be crafted into bins, tote boxes or almost any other accessory you can imagine (Photos 8 – 10). In this section, we’ll show you how to build the basic tower framework and a few custom accessories. You can devise variations to fit your storage needs.
The materials for the three towers cost just short of $200. The towers and shelves go together relatively quickly—you can easily build three in a day. Allow an additional day for 10 or so bins, depending on how detailed you choose to make them. They’re well worth the extra effort.
The cabinets are constructed of 3/4-in. birch plywood ($30 for a 4 x 8-ft. sheet). The cleats and back are made of 1/2-in. MDF (medium-density fiberboard; $14 for a 4 x 8-ft. sheet). See “MDF vs. Plywood: Your Choice” below for more details about selecting materials.
Assembly details
Start by cutting the plywood for the cabinet, following the dimensions we show in Fig. A. Use a circular saw and a straightedge for accuracy (Photo 1). Then cut the tops and bottoms of the cabinet 1/2 in. narrower than the sides (Fig. A).  Because of the cutting waste, you can only cut four 11-7/8 in. wide pieces from a 4-ft. wide sheet of plywood. One 4 x 8-ft. sheet will make two tower frames with sawdust left over.
Next cut a sheet of 1/2-in. MDF (Fig. A) to make the back, cleats and shelves. After cutting the cleats and back, you’ll have enough stock remaining for four shelves from each sheet. Cut your shelves to length after you’ve assembled the cabinet. Then double-check your measurements and cut the shelves to fit a little loose so they’ll slide easily.
Make the jig we show in Photo 2 to cut the cleats fast and accurately. Screw a 24-in. 2×4 perfectly perpendicular to the edge of a scrap of plywood. (Check it with a framing square.) Then screw a 1/4-in. stop block to the 2×4 so the cut-off distance is 5-3/8 in.
Caution: Don’t use a stop block thicker than 1/4 in. or the cleat might pinch the saw blade, making the saw kick back.
Cut 12 cleats from each 11-3/8 in. x 8-ft. length of MDF, leaving about 30 in. for a shelf. Screw the cleats to the plywood sides (Photo 3), positioning your first cleat 3/4 in. up from the bottom edge to allow space for the plywood bottom. Recess the drywall screwheads in the MDF so the bins won’t get hung up on them. MDF is so hard that the screws will snap if you try to drive them flush. Create the recess with a counterbore bit (Photo 3 inset), which you can buy at any hardware store for about $2. Position the top cleat down 3/4 in. from the top of each side panel to leave room for the plywood top.
To simplify attaching the cleats to the second side, clamp both sides back to back and flush top and bottom (Photo 3). Use a spacer long enough to bridge both sides. This ensures that all your shelves and bins will line up.
Tip: Before you remove the clamps, label both sides so you don’t confuse them with another pair.
The tedious part is over. Now assemble the cabinet sides, top, bottom and back (Photo 4), working on a flat floor where you have plenty of space. In addition, drive a couple of screws through the back into the cleats near the middle to keep the sides from bowing. Predrill the screw holes with a 1/8-in. bit so you don’t split the narrow 1/2-in. cleats.
Install the towers
If you rest the plywood tower directly on a concrete floor, it’ll absorb moisture and the plywood will swell. Instead, set the cabinet on a pressure treated 2×4 frame (Photo 5). Make the frame the same width as the tower (25-1/2 in.) but narrower in depth (about 10 in.) to provide a toe-kick, as in a kitchen cabinet. Either nail or screw the frame pieces together with 3-in. fasteners. Finally, mount the tower on the frame (Photo 5) and check it for plumb.
Finally, mount the tower on the frame (Photo 5) and check it for plumb. Important: Screw the tower through the back into the wall studs so it doesn’t tip over.
Customize for special uses
The space between towers is just as useful as the room inside them. Install a pair of closet poles 6 to 8 in. apart between two cabinets to hold soccer balls, basketballs or footballs (Photo 6). Hang a 2×8 on edge with a couple of joist hangers to hold a boat or trolling motor (Photo 6 and lead photo). Or simply cut 3/4-in. plywood shelves to various sizes and shapes for other special items.
Then build bins for the smaller stuff (Photo 7). Photos 8 – 10 show handy, easy-to-build bin styles. Cut in a few handholds and you can carry the stuff right to where you’re working (Photo 8). Insert a dowel through the side of a bin and you have a tote you can carry with one hand (Photo 9). Set dividers through the bin and for the first time in 35 years you’ll have nails and screws that actually have a place they can call home (Photo 10). Combine this with a cutout for a handle and you’ve made them a mobile home.
The secret to assembling bins is to begin with a shelf with 1 in. cut off the long side. This shelf is the bottom. Then cut the ends, fronts and backs and screw and glue them to the bottom (Photos 8 – 10 and Figs. B, C and D). Place dividers and handholds wherever they work best. Be sure to predrill all your screw holes, staying at least an inch away from the ends so you won’t split the 1/2-in. MDF pieces.
If you have a router table and finish nailer as well as some spare time, you can really go design crazy. Setting the dividers into routed grooves adds strength. Use your imagination and you’ll come up with all kinds of other ideas for customizing this system.
Required Tools for this Project
Have the necessary tools for this DIY project lined up before you start—you’ll save time and frustration.
- Circular saw
- Clamps
- Counterbore bit
- Drill/driver – cordless
- Framing square
- Level
- Straightedge
- Tape measure


Recent Comments