Do Your Own Garage Door Opener Repair and Troubleshooting
Garage door won’t open? With a little troubleshooting you can usually avoid a costly service call and get your garage door opener working again in no time.
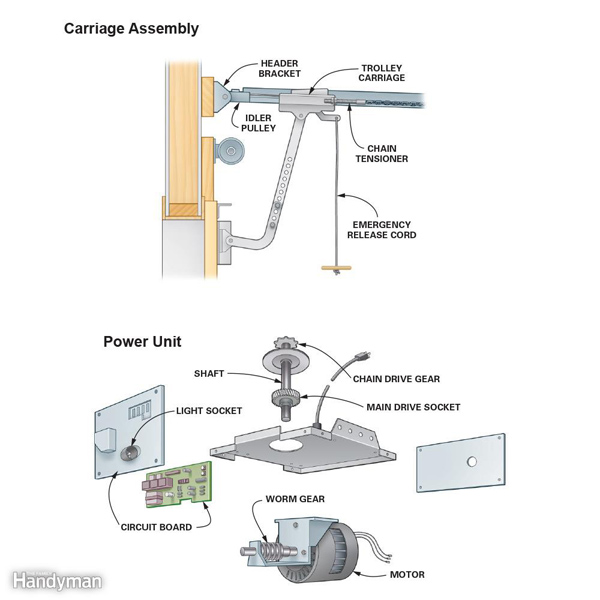
Check Your Door First
With the door closed, pull the emergency release cord and lift the door to see if it opens and closes smoothly. If it doesn’t, the problem is with your tracks, rollers or springs rather than your opener.
Play it Safe
Work with the door down. If the problem is a broken door spring and you pull the emergency release cord while the door is in the raised position, the door could come crashing down.
Unplug the opener. That way, you won’t lose a finger if your unsuspecting housemate hits the remote button while you’re working. Even worse, you could electrocute yourself, in which case you wouldn’t be able to blame your housemate at all.
Symptom: The Remote Works But the Wall Switch Doesn’t
Fix: Replace the wall switch and wires
If the remote works but the wall switch doesn’t, you may need to replace either the wall switch or the switch wires. To determine whether the switch or the wires are bad, first unscrew the switch from the wall and touch the two wires together (don’t worry, the wires are low voltage and won’t shock you). If the opener runs, you have a bad switch. If you have an older-model opener, a cheap doorbell button might work. If you have a newer opener that has a light and a locking option on the switch, buy the one designed for your model. A new one should cost you about $15.
If the opener doesn’t run when you touch the wires at the opener, use a small wire and jump those same two wires at the opener terminal. If the opener runs, the wire that connects the opener to the switch is bad. Sometimes the staples that hold the wire to the wall pinch the wire, causing a short. Install 18- to 22-gauge wire.
Symptom: The Wall Switch Works But the Remote Doesn’t
Fix: Replace batteries or buy a new remote or receiver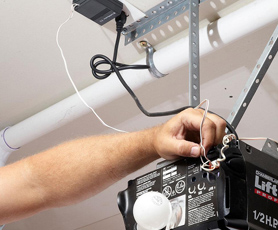
If the wall switch works but one of the remotes doesn’t, check the batteries first. Still nothing? You may need a new remote. Home centers carry a few models, and you can find a wide selection online.
If you can’t find one for your garage door opener model, you can try a universal remote or you can install a new receiver. A receiver replaces the radio frequency the opener uses with its own. An added bonus of a new receiver is that it will automatically update older openers to the new rolling code technology, which stops the bad guys from stealing your code. Just plug the new receiver into an outlet close to the opener, and run the two wires provided to the same terminals the wall switch is connected to.
Symptom: The Door Goes Up, But it Only Goes Down When You Hold Down the Wall Switch
Fix: Align or replace the safety sensor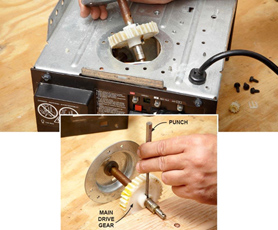
If the door goes up but goes down only when you hold down the wall switch, check to see that the safety sensors are in alignment. The small light on each sensor should be lit up when nothing is between them. Door sensors do go bad, so if no light is showing at all, you may need to replace them. You can save yourself some time by using the existing wires. Also, direct sunlight shining on sensor eyes can make them misbehave.
Symptom: You Have Power to the Outlet, But There’s No Sound or No Lights When You Push the Wall Switch and Remotes
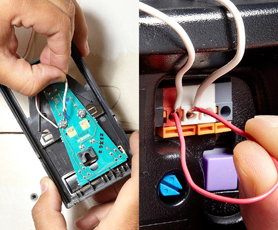
Fix: Replace the circuit board
If the outlet has power, but there’s no sound or no lights when you push the wall switch and remotes, you probably have a bad circuit board. Lightning strikes are the most frequent reason for the demise of a circuit board. The circuit board consists of the entire plastic housing that holds the lightbulb and wire terminals. The part number should be on the board itself.
Replacing a circuit board sounds scary, but it’s really quite easy. It will take 10 minutes tops and only requires a 1/4-in. nut driver. Just follow these steps: Remove the light cover, take out the lightbulb, disconnect the switch and safety sensor wires, remove a few screws, unplug the board and you’re done. A circuit board will cost about $80, so make sure you protect your new one with a surge protector. You can buy an individual outlet surge protector at a home center for less than $10.
Symptom: Everything Works Fine Except the Lights
Fix: Replace the light socket
If the bulbs are OK but don’t light up, you probably have a bad light socket. To replace the socket, you’ll need to remove the circuit board to get at it. Use the same steps as in ‘Replace the Circuit Board’ (above) to accomplish this.
Once the circuit board is removed, pop out the old socket by depressing the clip that holds it in place. Remove the two wire connections and install the new socket. Replacement sockets cost less than $15.
Be sure to use a bulb of the correct wattage. Using lightbulbs with a higher wattage than the socket is rated for will cause a socket to fail. Not only is this bad for the socket, but it can also be a fire hazard. If your light cover has turned yellow from heat, you’re probably using too strong a bulb.
Symptom: The Trolley Carriage Moves But the Door Doesn’t Open
Fix: Replace the trolley carriage
If the trolley carriage moves but the door doesn’t open, the culprit is probably a broken trolley carriage. Before you pull the old one off, clamp down the chain to the rail. This will help maintain the location of the chain on the sprocket and speed up reassembly.
Once the chain is secure, separate it from both sides of the trolley. Disconnect the rail from the header bracket and move the rail off to one side. Slide off the old trolley, and slide on the new one. Reattach the chain and adjust the chain tension. Replacing the trolley on a belt drive and replacing it on a screw drive are similar procedures. A new trolley will cost $25 to $40 depending on your model.
Symptom: The Opener Makes a Grinding Noise But the Door Doesn’t Move
Fix: Replace the main gear drive
If the garage door opener makes a grinding noise but the door doesn’t move, your main drive gear is probably toast. The main drive gear is the plastic gear that comes in direct contact with the worm drive gear on the motor. The main drive gear is the most common component to fail on most openers.
Replacing it is a bit more complicated than the other repairs in this article but still well within the wheelhouse of the average DIYer. There are several components that need to be removed before getting at the gear.
Lube the Rail
 No matter what type of garage door opener you have, you should always lube the rail where it comes in contact with the trolley carriage. Use a lubricant that doesn’t attract dirt. Silicone spray is a good choice. If you have a screw-drive opener, you’ll need to grease several spots along the rail gear at least once or twice a year. In colder climates, use lithium grease, which won’t harden when the temperature drops. Many home centers sell specifically formulated products near the openers. And don’t use too much or it could drip on your car.
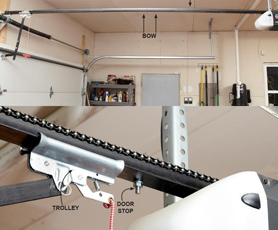
Check the Chain Tension
Most chain drive openers suggest you tighten the chain so there’s about 1/4 in. to 1/2 in. of slack from the rail to the chain (check your manual). Over tightening the chain will put excess wear and tear on the shaft and gears. Too little tension could cause the chain to skip off the sprocket and fall down on your car.
Adjust the Travel of the Door
There are two knobs on the opener that control how far the door travels up and down. Your door should press snugly against the garage floor so the weather stripping seals the gap. If the door travels too far down, it will cause the rail to bow upward. This also causes excess wear and tear on the shaft and gears.
Your door should travel up far enough so that the bottom of the door is just about the same height as the doorjamb. There is a door stop that prevents the carriage trolley from crashing into the opener. Make sure the trolley stops before hitting this bolt.


Recent Comments